Tuesday, 22 November 2016

Logo and Algorithms

LO: To develop basic programming skills
LO: To use knowledge of algorithms to produce a flowchart for a new programming language


Starter:


Complete the Snakes and Ladders algorithm by filling in the blank spaces.


Main:

1) What are the instructions for making a square? (This will be demonstrated at the front of the class!)


2) Using Logo:

How could we create this square using the built in commands?


3) Use this help card to produce an Octagon:


4) Have you refined this as much as possible?  What could you do to improve your instructions?


5) Using draw.io create an flowchart algorithm to show your refined sequence for your Octagon.

                        If you need help remembering which shapes to use, click HERE!


Extension: More advanced Pseudocode activities HERE


Plenary/Review:


Open up your evidence document from Google Classroom and complete the section for "Logo Progress" - Include flowchart and screenshot of your Octagon.


Extension: Can you create and evidence a Circle in Logo?


Friday, 18 November 2016

Storyboards (Cover)

LO: To use critical assessments to begin to design your own storyboards for your game.

Starter:


Look at your previous storyboards


Think about:

What stands out about it?
What good language has been used in the descriptions?
Can you picture this game screen? (Why is this important?)
Would this storyboard be useful in the design phase of your game?


Main:

Using the templates on Google Classroom, begin to design your game screens for the following screens:

1) Main Menu
2) Instructions
3) Backstory
4) Level 1 - 5
5) Win Screen
6) Lose screen


Extension - Having designed your screens, begin to explain why you have designed them in that way.


Review:


Swap seats with your partner and give critical feedback about each screen created (3 starts and a wish)


Tuesday, 8 November 2016

Future Worlds tracking

LO:
To use marking scheme to critique your work so far
To use tracking document to focus on key areas to develop

Starter:

Using the Future Worlds makscheme.  Read through and highlight key words for each strand (Not Strand E - we will do this next lesson)


Main:

Task 1:
Open up your Future Worlds tracking document

For each section:
     1) Read and decide where you think you sit on the markscheme
     2) Mark as either N (Nothing), P (In progress/Not up to target grade), Y (Completed to expected standard)


What do I need to do to reach my target?
Open the '10n6 Improvements FW' document in Google Classroom.

Task 2:


1) Pick 5 items from the "What do I need to have?" column

2) Why wave you chosen this item?

3) What do you need to do to improve it?


Task 3:

Begin to make the imporvements you listed on your Google Slides documnet


Plenary:

Update your tracker with any changes you have made.

Monday, 7 November 2016

CS - Mid-Unit prep

LO:
To consolidate learning of topics covered so far.
To use tracking document to prepare for a mid-unit assessment.


Starter:

Log into Google accounts and "unsubmit" all 3 Lesson packs so you become the "author" again.
Open the lessons and read over all BLUE, PURPLE and BROWN slides.


Main:

Log in to Google Classroom and open up the Theory tracker document.
1)  Look back over the previous 3 lessons slides pack and complete the document with one of the following:
     N = Not done or No understanding of item
     L = Low understanding of item
     M = Medium understanding of item
     H = High understanding of item

2) In preparation for tomorrows mid-unit assessment:
    Using the Google Slides template - create a revision document to help in your preparation.
    Slide 1: Items to move from N
    Slide 2: Items to move from L
    Slide 3: Items to move from M
 
    What do you need to find out to be more secure in your understanding?


Ext: Use your Python knowledge to complete the Mastermind challenge:
        http://usingpython.com/python-programming-challenges/


Review:

Look back at your tracking document - Is there anything that you can now upgrade?


Python Lesson 1: Basic Syntax

LO:  
To learn how Python works and be able to open on the school network
To understand what a syntax is in Coding.


Discuss:

Why is important to learn how to code?


Main:

1) Open up Python in IDLE


    Write the following:  print("Hello World")
    What do you thin this will do when the program runs?

Mini-Plenary:
Open up your Self assessment document
 Fill in the first point with either H,M,L,N
Close Python completely


Main 2:

1) Use your knowledge to open Python in IDLE (Remember to get this in a new window)
2) Using slides 5 and 6 from the above presentation - add to your program using a Variable.

Plenary:
Create a 3 question yes/no quiz
Move seats with the person next to you to test out their program - Has it worked? If not, what error has occurred - what might this mean?


Storyboards Introduction

LO: To begin to analyse storyboards and critically assess examples.
LO: To use critical assessments to begin to design your own storyboards for your game.

Starter:


On a separate post it note for each -

Write down 3 good things and 1 improvement to be made for the following 3 storyboards:
1) https://drive.google.com/file/d/0B76tWhiHg_EsT2FGay1kVUJBcTg/view
2) https://drive.google.com/file/d/0B76tWhiHg_EsTHlERVRqeU5ibDQ/view
3) https://drive.google.com/file/d/0B76tWhiHg_EsLWZjdHBfNUJkYWs/view

Think about:

What stands out about it?
What good language has been used in the descriptions?
Does colour make a difference to the understanding?
Can you picture this game screen? (Why is this important?)
Wold this storyboard be useful in the design phase of your game?


Main:

Using the templates on Google Classroom, begin to design your game screens for the following screens:

1) Main Menu
2) Instructions
3) Backstory

Remember to use your post it notes for ideas on how to make useful storyboards.

Extension - Having designed your screens, begin to explain why you have designed them in that way.


Review:


Swap seats with your partner and give critical feedback about each screen created (3 starts and a wish)


Friday, 4 November 2016

Future Worlds - Review

L/O1 To be able to critically review your game 

L/O2 To develop an understanding of the success criteria for Strand E 


Outcomes: You will start to evaluate your game; critically reflecting on strengths and weaknesses of your game, and will develop an understanding of the mark scheme
Starter - 5 minutes

Read through Strand E (5 marks) (printed in front of you from last lesson)

Highlight the keywords that best describe how to create a successful review of
your game. 


Task 1:


  1. Take a look through some of the existing game reviews out there - there is a FIFA16 one in front of you and on this website https://archive.org/details/pczonemagazine
  2. Q: What makes them excellent reviews?

Task 2:


Download and use THIS DOCUMENT to begin PLANNING what you will include in your review

Task 3:

Start writing your review using suitable software (Microsoft Publisher? Google Docs?)

Try to use the formatting features in your chosen software to make it look professional and like an online publication

Plenary:

Swap seats with a Test Buddy and use the yellow column on the planning document to mark the answers given (2 marks complete, 1 mark partly completed)

Ext:

Open up the tracking document and mark review as complete.   Begin improvements where needed.

REMEMBER:
Clinic - Monday, Wednesday, Friday in rm 566

Monday, 3 October 2016

E-Safety

Year 7


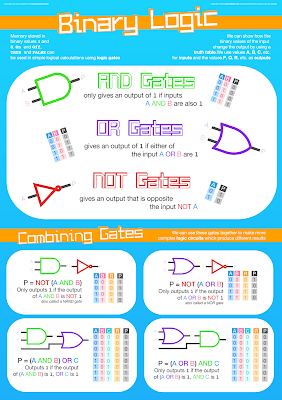
Logic Gates

H/W - Revise for the Logic exam paper (Logic gates and Binary) next lesson (after 1/2 term) .


Using either Adobe Fireworks or Microsoft Publisher create a poster explaining each of the following truth tables:
  • AND
  • NOT
  • OR


Add your Truth Table poster to your Computing blogs


Plenary

Try the Boolean Logic Quiz: http://www.bbc.co.uk/education/guides/zc4bb9q/test


Homework - Revise for the Logic (Logic gates and Binary) test next lesson (after 1/2 term) .

Friday, 30 September 2016

Moodboards


LO1 – To develop your understanding of a moodboard

Outcomes:

To collect images for your moodboard.

Starter:

What is a moodboard? Use these links to help you:


Main:

Before you start on any detailed design work you must create a moodboard. This is where you communicate your initial design ideas for your game. You should use it to get feedback from your game testers. The moodboard should include inspirational materials/images for:
  • the game genre and style
  • settings/environments
  • any original characters
  • any music, sound effects or speech
  • anything else you think is important
You should annotate your moodboard to explain your ideas.

Tasks:

1) Start searching for images for your moodboard
2) Save these images into your moodboard folder

You MUST collect inspirational images for ALL of the items on the checklist
You MUST have multiple images for ALL items on the checklist


Thursday, 22 September 2016

Logic Gates

LO:
To understand what a logic gate is and be able to describe and give a real world example of each

STARTER:

Recap operators > < =: We will do this as a whole class again!


MAIN:

Task 1: 

Watch the following video:

http://www.bbc.co.uk/education/guides/zc4bb9q/revision/2

Task 2:

What do you think the term Logic Gates means?
You have 3 minutes to research the symbols involved in Logic Gates - what can you tell about the shapes involved?

Task 3:

1) Click on the following link: http://logic.ly/demo/ 

2) Create 3 simple circuits for AND, NOT and OR using a light bulb to demonstrate the circuit is working 

in the correct way.

3) Screenshot your evidence of each circuit working and paste it into your Unit 3 Evidence Document from last lesson

PLENARY:

Complete the 2 tasks on the following website: 

http://www.advanced-ict.info/interactive/circuits.html


Wednesday, 21 September 2016

Future Worlds - Getting started


Getting Organised

You need to ensure you save all the work you do in the correct folders.

Create a folder called DA204SPB which contains these two subfolders:
PRODUCTS – all final products must be saved here
EVIDENCE – all other evidence must be saved here


RED
Set up the folder structure needed for Future Worlds

AMBER
Set up your e-portfolio
Add all required links to your page

GREEN
Add a suitable banner to the top of your e-portfolio

EXTENSION
Customise your e-portfolio to suit your individual styles

Starter:
Create the folders needed in your sites folders.


Main:


1. Open Adobe Dreamweaver

2. File --> New --> Blank Page


3. Go to my goo.gl/hOhG6C and copy all of the text and put it on yours to fit your style

4. Save your page in DA203SPB as homepage.html

5. Using Adobe Photoshop or Fireworks, create a new blank document 900 pixels wide x 250 pixels high

6. Create a gaming related banner for your Future Worlds ePortfolio

7. Insert your banner into your ePortfolio. Save it.


Monday, 13 June 2016

Creating Websites in Dreamweaver

Objectives:
Create a website template using Adobe Dreamweaver


Create a folder in your SITES called Year 8 Website
---------------------------------------------------------------------------------------------------------
Task 1a) Create an HTML Template


b) Manage Sites


Task 2:a) Add an editable Region


b) Make and Insert a Banner


Task 3: a) Changing the website appearance:


---------------------------------------------------------------------------------------------------------

Extension
Use the playlist below to expand your knowledge of making a website using Dreamweaver:

Monday, 23 May 2016

Photoshop

L/Os - To develop new skills using Adobe Photoshop
OUTCOMES - You will have identified and practised new skills. You will have created a photomontage using Adobe Photoshop.


Take the Real or Photoshop quiz HERE


STARTER:

  1. Download the montage images HERE
  2. Save them into your Year 7 ICT folder
  3. Open Adobe Photoshop


Learn TWO new tools/techniques in Adobe Photoshop and be prepared to share - you can use the videos HERE to help you


EXTENSION:

Create your own A4 montage using a variety of Adobe Photoshop skills


Wednesday, 18 May 2016

Python 1 and 2

LO:  To understand what a syntax is and complete a simple Maths calculator in Python.


Download the python evidence document here


****************** PART 1 ******************

Create a simple 'Hello' program in Python using the 'Print' command.


Task 1: Write this code:

1.print (“Hello, how are you today?”)
2.print (“I hope you are enjoying learning Python”)
3.print (“What shall we code next?”)


Now change it to make your own message.

Task 2:
Python has an in-built calculator.

Try out a calculation in Python using the Print command.
* = Multiplication
- = Subtraction
/ = Division
+ = Additions
1.print (5*2)
2.print (6+6)
3.print (6/2)


See if the person next to you is just as quick to work out the calculation.


****************** PART 2 ******************


PLENARY:

Complete the evidence document for the first 2 sections.


Tuesday, 26 April 2016

Spreadsheets

LO:  To be able to use spreadsheets to perform different calculations


Video

TASK 1:

Complete the 3 workbooks from Google Classroom:

TASK 2:

Click the two links below to complete the spreadsheet challenge:

instructions

spreadsheet

EXTENSION:

Use your knowledge to produce a Battleships style game

Monday, 25 April 2016

Binary and ASCII


Understand how to decode binary numbers and convert them to letters using ASCII.


Friday, 22 April 2016

Year 10 Web Exam

  1. Open the ESCAPADES brief
  2. Open DREAMWEAVER
  3. Manage Site to your new ESCAPADES project folder
  4. Click File > New Template to set up a new BLANK HTML template that looks appropriate
  5. Click on edge of template and set to 100% width
  6. Change some of the colours of your template
  7. Highlight all text in the white section of your template and click: Insert > Template Objects > Editable Region and click OK
  8. Save Template by clicking File > Save As Template and call it 'Template'. It should now be calledtemplate.dwt
  9. Create new pages by clicking File > New > Page from Template
    *If your template does not appear in the little window here, you have not done step 3 correctly - do it now!*
  10. Save your new HTML page by clicking File > Save As and saving it as an appropriate name (Home, Contact Us, etc...). This shouldnt Save in your templates folder
  11. Repeat step 9 and 10 as much as you need. These pages should all end .html

    Your template.dwt IS NOT your home page, do not put home page information on it, put this on your home.html page
  12. On your template, change the link names from 'Link One' to 'Home' and so on. Pressing Enter after 'Link Four' will create more space for more pages
  13. Highlight where you have written 'Home' and click the little folder icon at the bottom (next to Link), to link the text to your home page
  14. Repeat for all links

    When you 'Save' your template.dwt after making new .html pages, it SHOULD now ask you to 'update', which you should agree to

    After saving and updating your template, you will need to save each .html page too

Monday, 11 April 2016

Presentation Skills

Task 1:
In groups of 4:
1) Write down all the things wrong with each of the slides displayed on the board.

2) What would you do differently?


Task 2:
1) Download the following presentation by clicking HERE

2) In your groups - discuss how you could improve this presentation.
Think about the following:
Image editing
Design Features (font etc)
Transitions
Animations
Slide Show settings

3) How could you make this appear more professional?

           
Extension:
Pick a topic of your choice and begin to make a high-quality, professional presentation.


Review:
Class discussion - What changes have you made and why?

Monday, 21 March 2016

Unit 4: Input and Output

Understand the differences between input and output devices

Recognise where sensors are used in everyday objects